





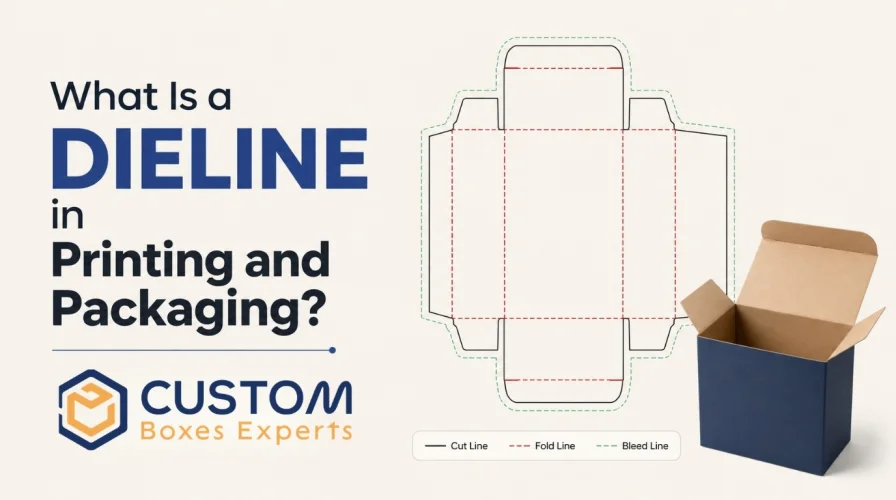
If you examine a stunningly custom printed box placed on a retail shelf, it appears neat. But behind this box, before it was put together, folded, and glued, there was once just a flat piece of paperboard.
What enables all this assembly is the blueprint laid out on a flat piece of paperboard. And without an absolutely accurate dieline, you can’t properly print, cut, or fold your box.
For brands looking to build high-quality packaging, working with Custom Boxes Experts is the best way to get this technical step right. Let us look at what a dieline is, how it works, and why it is so important for your business.
What Is a Dieline?
The dieline is defined as a vector artwork used for the purpose of guiding the printing and packaging equipment in the manufacturing of products. The dieline serves as a map showing the areas in which the printing and packaging machine will have to cut, crease, and fold the material.
The dieline is used to guide the machinery on how to work on the flat design in order to make sure that it properly fits into the three-dimensional package.
Mostly, dielines are made by graphic designers who use vector graphics software. The advantage of this method is that the lines remain sharp and clear regardless of the scale at which they are rendered.
The 6 Key Elements of a Packaging Dieline
A standard dieline consists of several different colored lines and markings. Each line tells the manufacturing machine to perform a specific action.
1. Cut Lines (Solid Lines)
Cut lines can either be drawn in red or black, depending on whether they are represented using solid lines. Cut lines show the outline of the box whose measurements will be determined using the cut lines. These also identify the exact place where the cutter cuts the paperboard to form a box.
2. Fold Lines (Dashed or Dotted Lines)
Crease lines are also referred to as fold lines and are indicated by broken/dotted lines. They indicate the exact places where the bending process needs to take place. Bending of the board through the machine becomes easier through these lines.
3. Bleed Lines
Bleed is the final edge of your layout, which is about 0.125 inches larger than your cut lines. The reason for that is that you have to extend your background colors and photos up to that line. It will prevent any thin paper edges from appearing because of the shift of the cutting machine.
4. Safe Zone Lines
Safe Zone is a hypothetical line that is set up slightly inward of the cutting/folding line. All the essential elements, such as logo, barcode, and ingredients, must remain within the safe zone to ensure that no vital information is unintentionally cut or folded.
5. Glue Tabs
Glue tabs are the flaps of the custom box where adhesive is applied to hold the 3D structure together. On a dieline, these areas must remain completely free of ink, coatings, or varnishes. This allows the glue to bond properly to the raw paperboard during assembly.
6. Perforation Lines
Perforation holes are very tiny and do not penetrate all the way through the paper. Perforations facilitate easy separation into different parts or even create detachable coupons or holes in boxes for the dispenser.
Why Dielines Matter in the Packaging Industry
Designing the layout of boxes on your own might seem simple enough, but a single mistake could cost you thousands of boxes. Here are some reasons why the use of dielines is important in production.
They Prevent Alignment Errors
If the designer doesn't have the dieline to refer to, it will be a matter of pure guessing. It is all too easy to position the text too close to the line of the fold or even position a logo in the wrong place on the box.
They Reduce Material Waste
Paperboard and cardboard could become expensive. A template for dielines will help to fit several different boxes on one sheet. With good planning, waste can be reduced by up to 15%
They Cut Down Production Costs
To correct anything after the printing plates have been made is very expensive. By doing a mock-up digitally, you will be able to see where the errors are and fix them before anything else happens.
Step-by-Step Process to Create a Dieline
Designing a professional dieline requires technical precision and the right software. Here is the standard process that designers follow.
Step 1: Measure Your Product
Everything starts with accurate measurement. To start with, you have to measure the length, width, and height of your product. You have to remember that there will be a need to leave some space for packaging or instructions.
Step 2: Choose Your Box Style
Choose the best box style for your product. Are you looking to use tuck end boxes, Mailer Boxes, or Gift Boxes? There are different ways of folding and tabbing in each box style.
Step 3: Create the Vector Paths
Make an outline using vector software of your box. Use different layers when creating your cuts, folds, and bleed areas. Do not use any photo editing software such as Photoshop because pixelated lines cannot be recognized by the machine.
Step 4: Add the Artwork
When you have finished your structural template design, make sure you lock your dieline layer. Then you will need to create a new layer, and this will be where you put all of your art, colors, pictures, and text.
Step 5: Print a Physical Prototype
Before starting bulk production, print your flat dieline on a piece of thick cardstock. Cut it out with scissors and fold it by hand to make a physical model. This helps you verify that the panels fit together tightly and that the artwork faces the right way.
Common Types of Packaging That Use Dielines
Almost every structured package on the market relies on a specific type of template.
Folding Cartons: These are the lightweight paper boxes used for cereal, cosmetics, medicine, and tea. Their designs are highly precise to allow fast assembly.
Mailer Boxes: Made from thicker, corrugated cardboard, mailers are designed for shipping. Their templates include heavy double-lined walls and sturdy locking tabs.
Rigid Boxes: Used for luxury items like smartphones and perfumes. Their templates often feature two separate pieces, such as a base and a lid.
Labels and Sleeves: Even flat labels for bottles and jars require templates to ensure they wrap around the container without overlapping awkwardly.
Dieline vs. Regular Design Layout
It is easy to confuse a dieline with a standard graphic design layout. Let us look at how they compare.
Feature | Packaging Dieline | Regular Design Layout |
Primary Purpose | Guides cutting, creasing, and assembly machines | Displays the visual artwork and brand graphics |
Key Indicators | Includes cut lines, fold lines, and glue tabs | Includes text, color themes, and images |
Technical Focus | High structural accuracy and exact dimensions | Visual appeal, layout, and color harmony |
Best Software | Adobe Illustrator, ArtiosCAD | Photoshop, Illustrator, InDesign |
End Product | A physical, folded 3D custom box | A flat printed poster, flyer, or page |
4 Common Dieline Mistakes to Avoid
Even experienced designers can make small slip-ups that lead to major production delays. Keep an eye out for these frequent mistakes.
1. Ignoring Material Thickness
Thicker paperboard requires more room to fold cleanly than thin paper. If you ignore the thickness of your cardstock, the panels of your box will crowd each other, causing the box to bulge or tear at the corners.
2. Placing Artwork on the Wrong Panel
In analyzing a two-dimensional pattern, it may be difficult to identify which part becomes the back, top, or bottom part of the box. Putting the text upside-down or on the wrong side is a frequent error. Always try to fold your paper model for verification purposes.
3. Forgetting the Bleed Area
If you do not extend your background artwork past the cut lines, a tiny shift in the cutting machine will leave thin, messy white borders on the edges of your finished boxes.
4. Poor Layer Organization
Always keep your structural lines on a separate layer from your graphic design artwork. If you merge these layers, the printer might print the actual red cut lines directly onto your finished packaging.
Conclusion
The dieline is the unsung hero in the packaging industry. It transforms conceptual designs into practical and attractive Custom Packaging Boxes. The right knowledge on how to organize your packaging templates, avoid common errors, and apply the appropriate vector tools will make sure that your packaging looks perfect.
Ready to make sure your next packaging project is completely flawless? Contact Our Custom Boxes Experts today to get your print-ready dielines and start designing!
Frequently Asked Questions (FAQs)
What is a dieline in layman’s terms?
It is the flat digital template, which provides packaging machines with all necessary instructions to cut, fold, and glue the box.
Why are there different colors in a dieline?
Different colors and lines are used to designate particular actions: cutting, folding, perforating, etc.
Is it possible to create a dieline in Photoshop?
No, it is impossible. Photoshop allows creating only raster images based on pixels. It is necessary to use vector-based software like Adobe Illustrator for dieline creation.
What will happen in case of omitting the bleed line?
There can be white lines around your boxes because of the cutting machine's shift during the manufacturing process.
How can I check my design if it is correct before printing?
You should print the flat template on a sheet of paper, cut it out, and assemble it to check the fit and alignment.